🚀 NodeRAG is a heterogeneous graph-based generation and retrieval RAG system that you can install and use in multiple ways. 🖥️ We also provide a user interface (local deployment) and convenient tools for visualization generation. 📊 Click here for a quick start guide ✨. You can read our paper 📄 to learn more. For experimental discussions, check out our blog posts 📝. If you’d like to contribute to our project, please visit our GitHub repository 🤝.
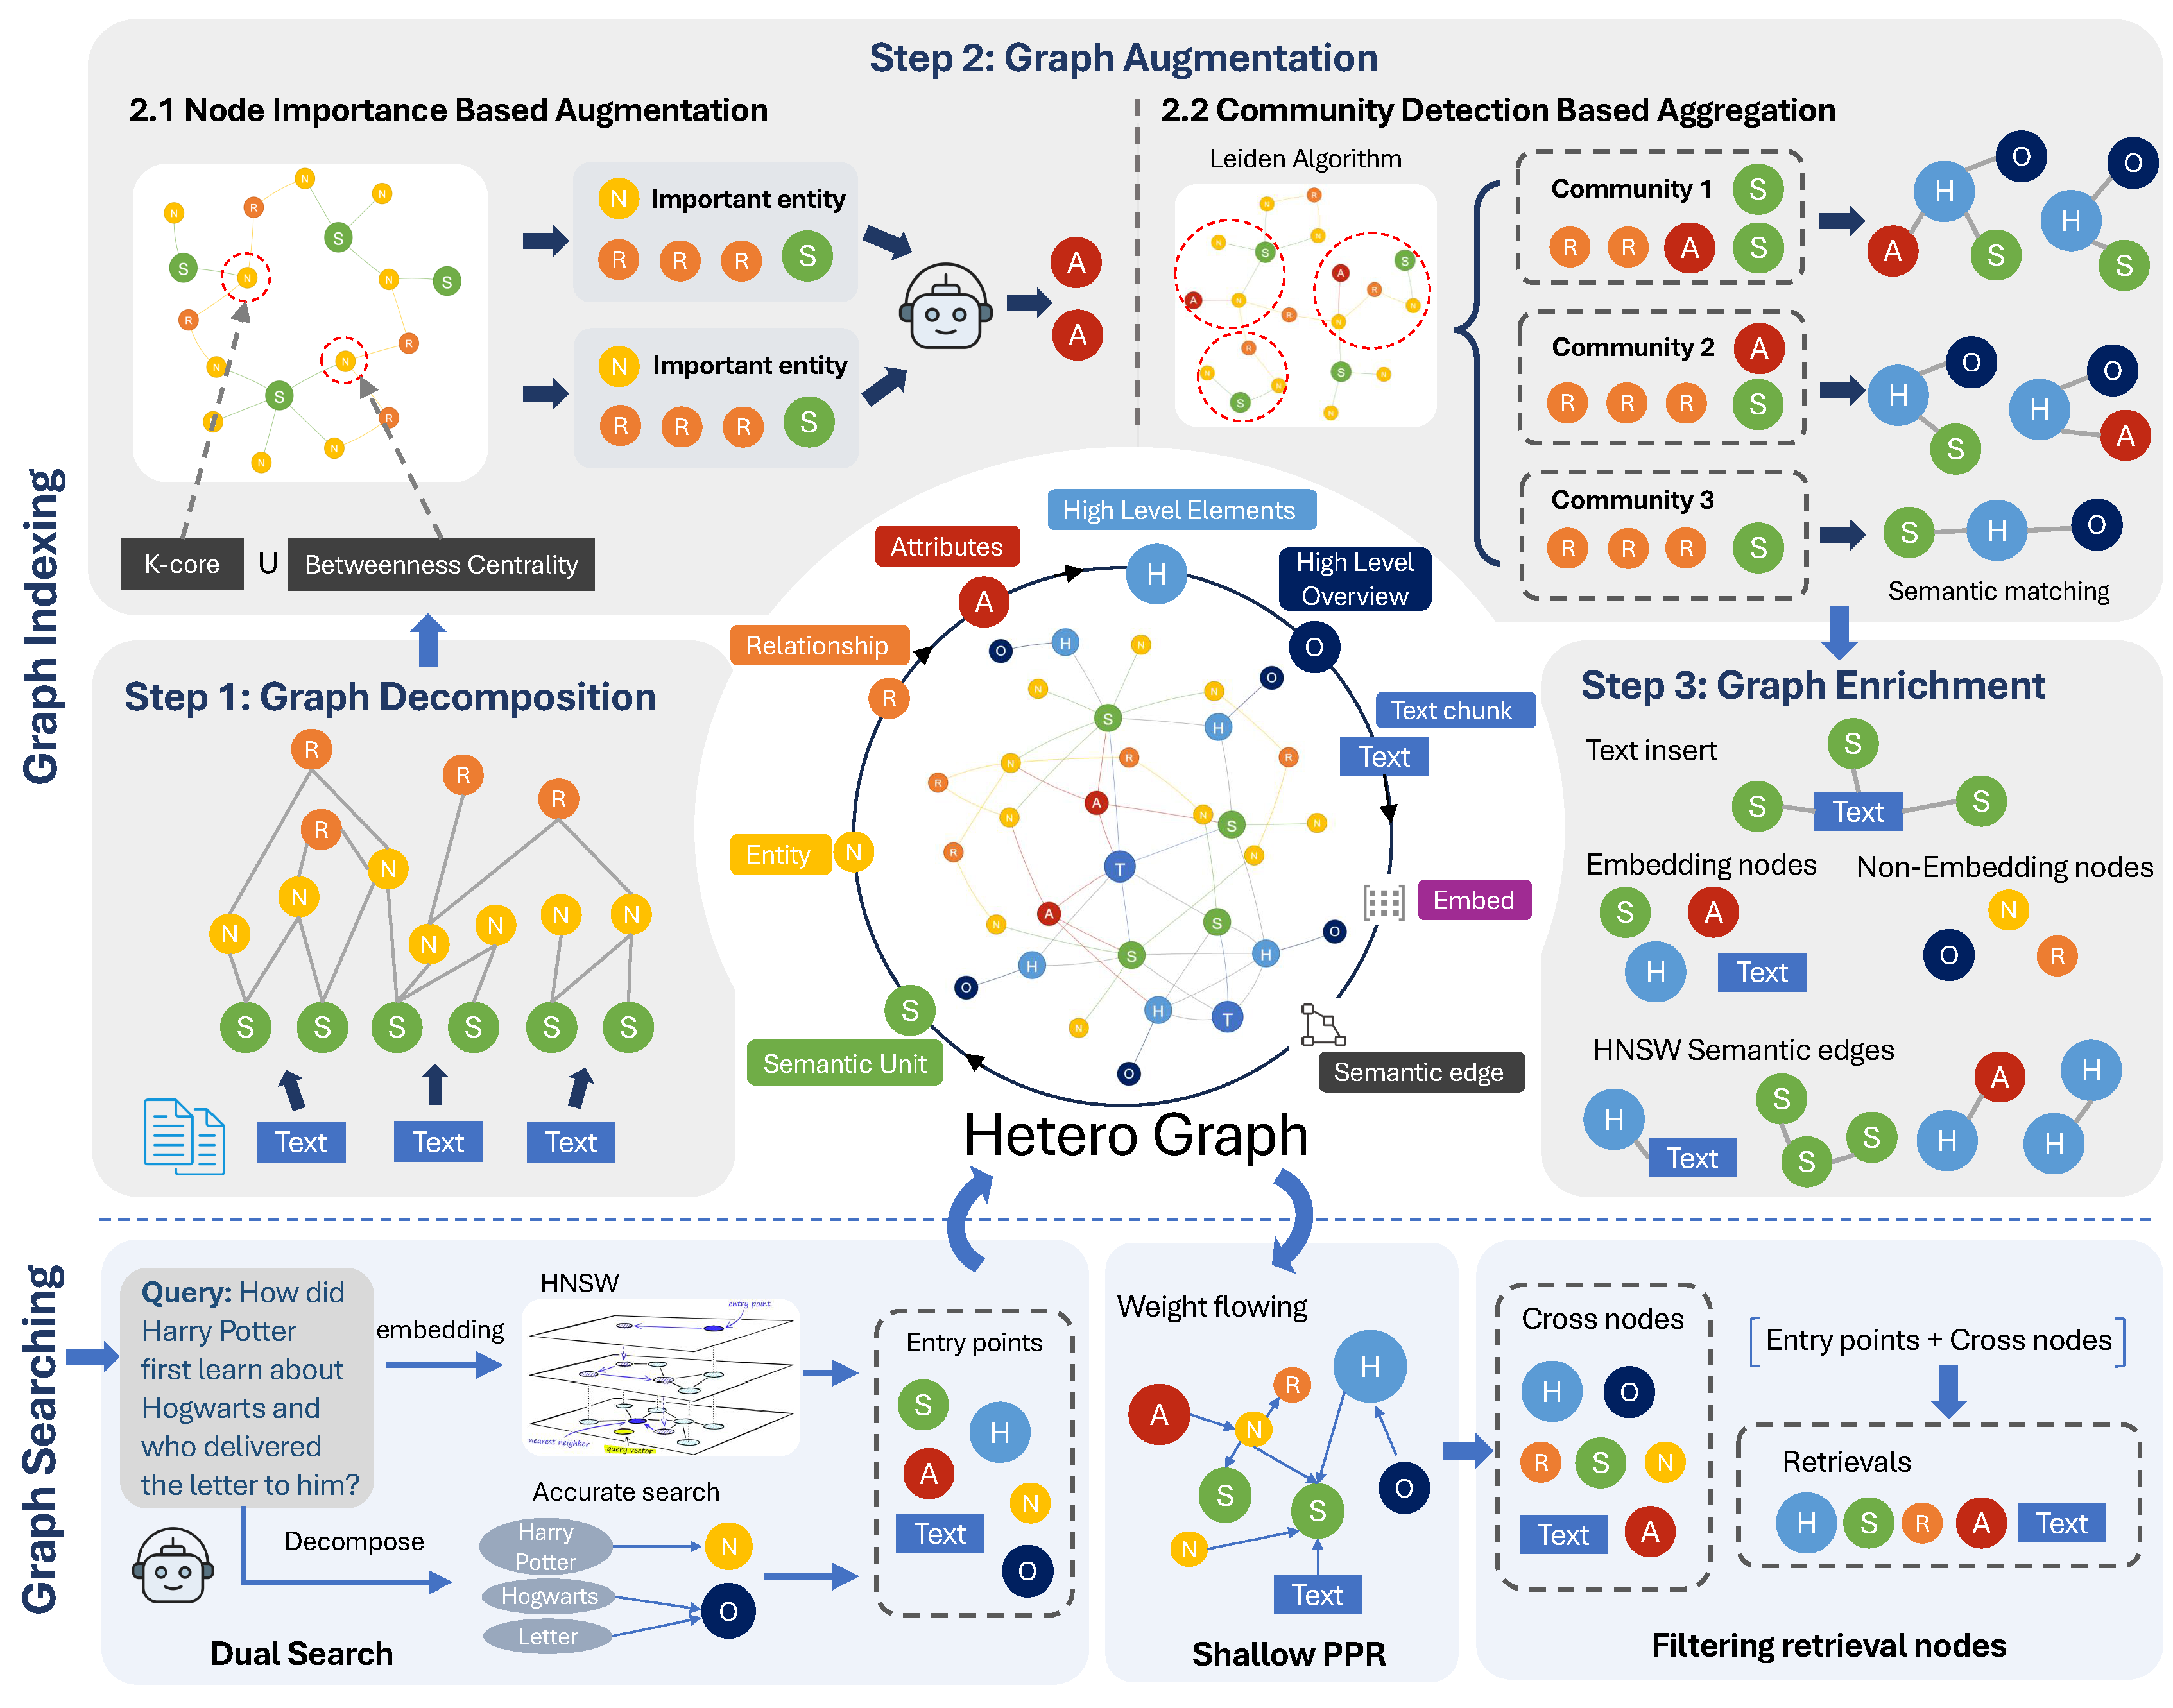
NodeRAG System Architecture
1 - Quick Start Guide
Get started quickly with NodeRAG
This guide will help you set up and run your first NoteRAG project in minutes.
1.1 - Install from PyPI
Learn how to install NodeRAG using pip.
This guide provides simple instructions for installing NodeRAG from PyPI.
Conda Setup
Create and activate a virtual environment for NodeRAG:
Learn how to index the NodeRAG base from the original corpus. This guide provides step-by-step instructions for efficient indexing.
2.1 - Build
Learn how to build and configure the NodeRAG project.
This guide provides step-by-step instructions for setting up the project structure and configuration.
Build
Get familiar with project construction
The NodeRAG project has the following structure. You need to manually construct this structure by creating a project folder and placing the input folder inside it. In the input folder, place the corpus you need to RAG.
input: Contains all input files to be processed by NodeRAG. Supported file formats include: .md, .doc, and .txt.
Quick Input Example
Download this txt file as a quick example to your input folder.
Config
python -m NodeRAG.build -f path/to/main_foulder
When you first use this command, it will create Node_config.yaml file in the main_folder directory.
Modify the config file according to the following instructions (add API and service provider) to ensure that NodeRAG can access the correct API.
To quickly use the NodeRAG demo, set the API key for your OpenAI account. If you don’t have an API key, refer to the OpenAI Auth. Ensure you enter the API key in both the model_config and embedding_config sections.
For detailed configuration and modification instructions, see the Configuration Guide.
#==============================================================================# AI Model Configuration#==============================================================================model_config:model_name:gpt-4o-mini # Model name for text generationapi_keys:# Your API key (optional)embedding_config:api_keys:# Your API key (optional)
Building
After setting up the config, rerun the following command:
python -m NodeRAG.build -f path/to/main_folder
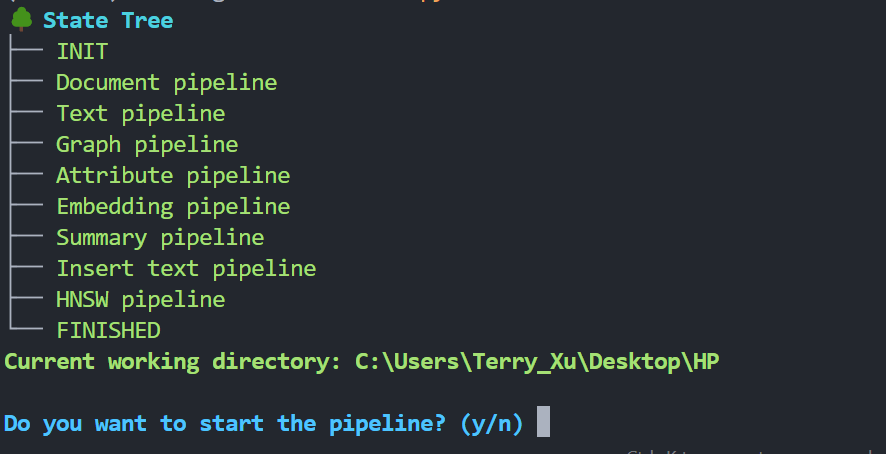
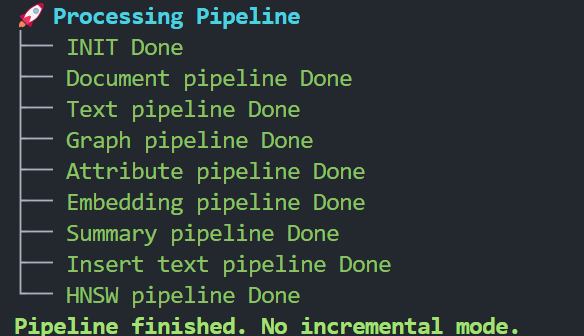
The terminal will display the state tree:
Press y to continue. Wait for the workflow to complete.
For the next step, see the Answer documentation to generate domain-specific answers.
2.2 - Increment Update
NodeRAG supports incremental updates of the corpus.
Incremental Update Support
NodeRAG supports incremental updates. It tracks the hash IDs of previously indexed documents to manage updates efficiently. Do not modify files that have already been indexed, as this may lead to duplicate indexing or unpredictable errors.
Best Practice for Adding New Corpus
To add new documents, place the new files in the input folder, then rerun the indexing command:
python -m NodeRAG.build -f path/to/main_folder
NodeRAG will automatically detect new files and convert them into its internal database format without reprocessing existing data.
For more details on incremental mode and a comparison between GraphRAG and LightRAG approaches to incremental updates, see this blog post.
3 - Answer
Learn how to use NodeRAG to assist models in generating domain-specific answers.
There are two ways to use NodeRAG:
Direct module import in your code
API client connection to a deployed NodeRAG service
Each method has its advantages. Direct import offers a simple and immediate integration for local use. However, if you plan to deploy NodeRAG as a service, using an API client is considered best practice.
3.1 - import module
Learn how to import modules to use NodeRAG directly in your code.
Import Modules
Build a search engine quickly with minimal setup:
fromNodeRAGimportNodeConfig,NodeSearch# Load configuration from the main folderconfig=NodeConfig.from_main_folder(r"C:\Users\Terry_Xu\Desktop\HP")# Initialize search enginesearch=NodeSearch(config)
Answer a Question
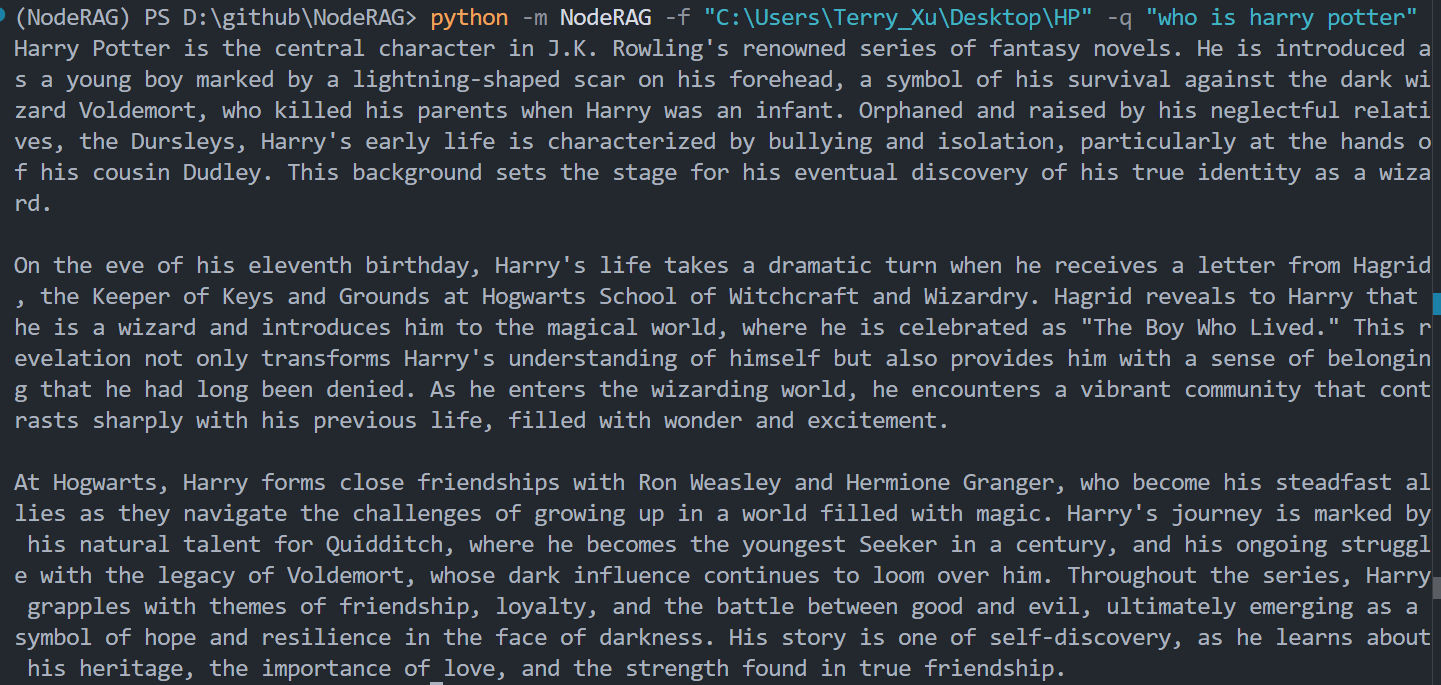
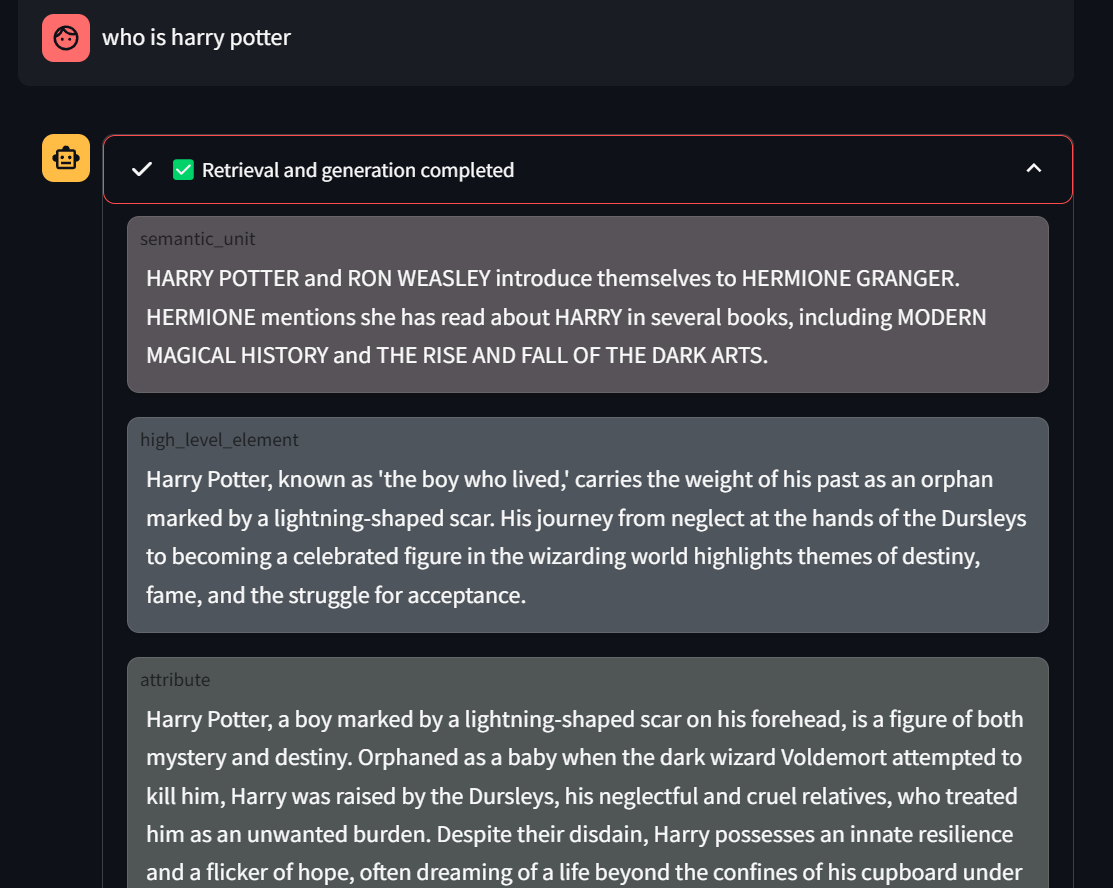
# Query the systemans=search.answer('who is harry potter?')# 'ans' is an object with several accessible attributes:# Response: the generated answer to your questionprint(ans.response)# Number of tokens in the answerprint(ans.response_tokens)# Retrieval info: the context used to generate the answerprint(ans.retrieval_info)# Number of tokens in the retrieval contextprint(ans.retrieval_tokens)
Notes
search.answer() returns an object that encapsulates both the answer and the retrieval context, along with useful metadata.
This method is ideal for quick integration into Python scripts or Jupyter notebooks, without setting up an API server.
3.2 - localhost
Learn how to set up the NodeRAG API client and generate answers from requests
Set Up API Client
Make sure you have already indexed your corpus, then start the API server with the following command:
python -m NodeRAG.search -f path/to/main_folder
This will launch a Flask-based API client.
You can modify the localhost address and port by updating config.url and config.port in your configuration file.
#==============================================================================# Document Processing Configuration#==============================================================================config:# Search Server Settingsurl:'127.0.0.1'# Server URL for search serviceport:5000# Server port number
Use in Terminal
After setting up the client, you can use NodeRAG directly from the command line. The request code is fully encapsulated for ease of use.
To retrieve both the answer and its associated context, use the -r -a flag:
python -m NodeRAG -f path/to/main_folder -q "your question" -r -a
Use in Python / Jupyter Notebook (Common way)
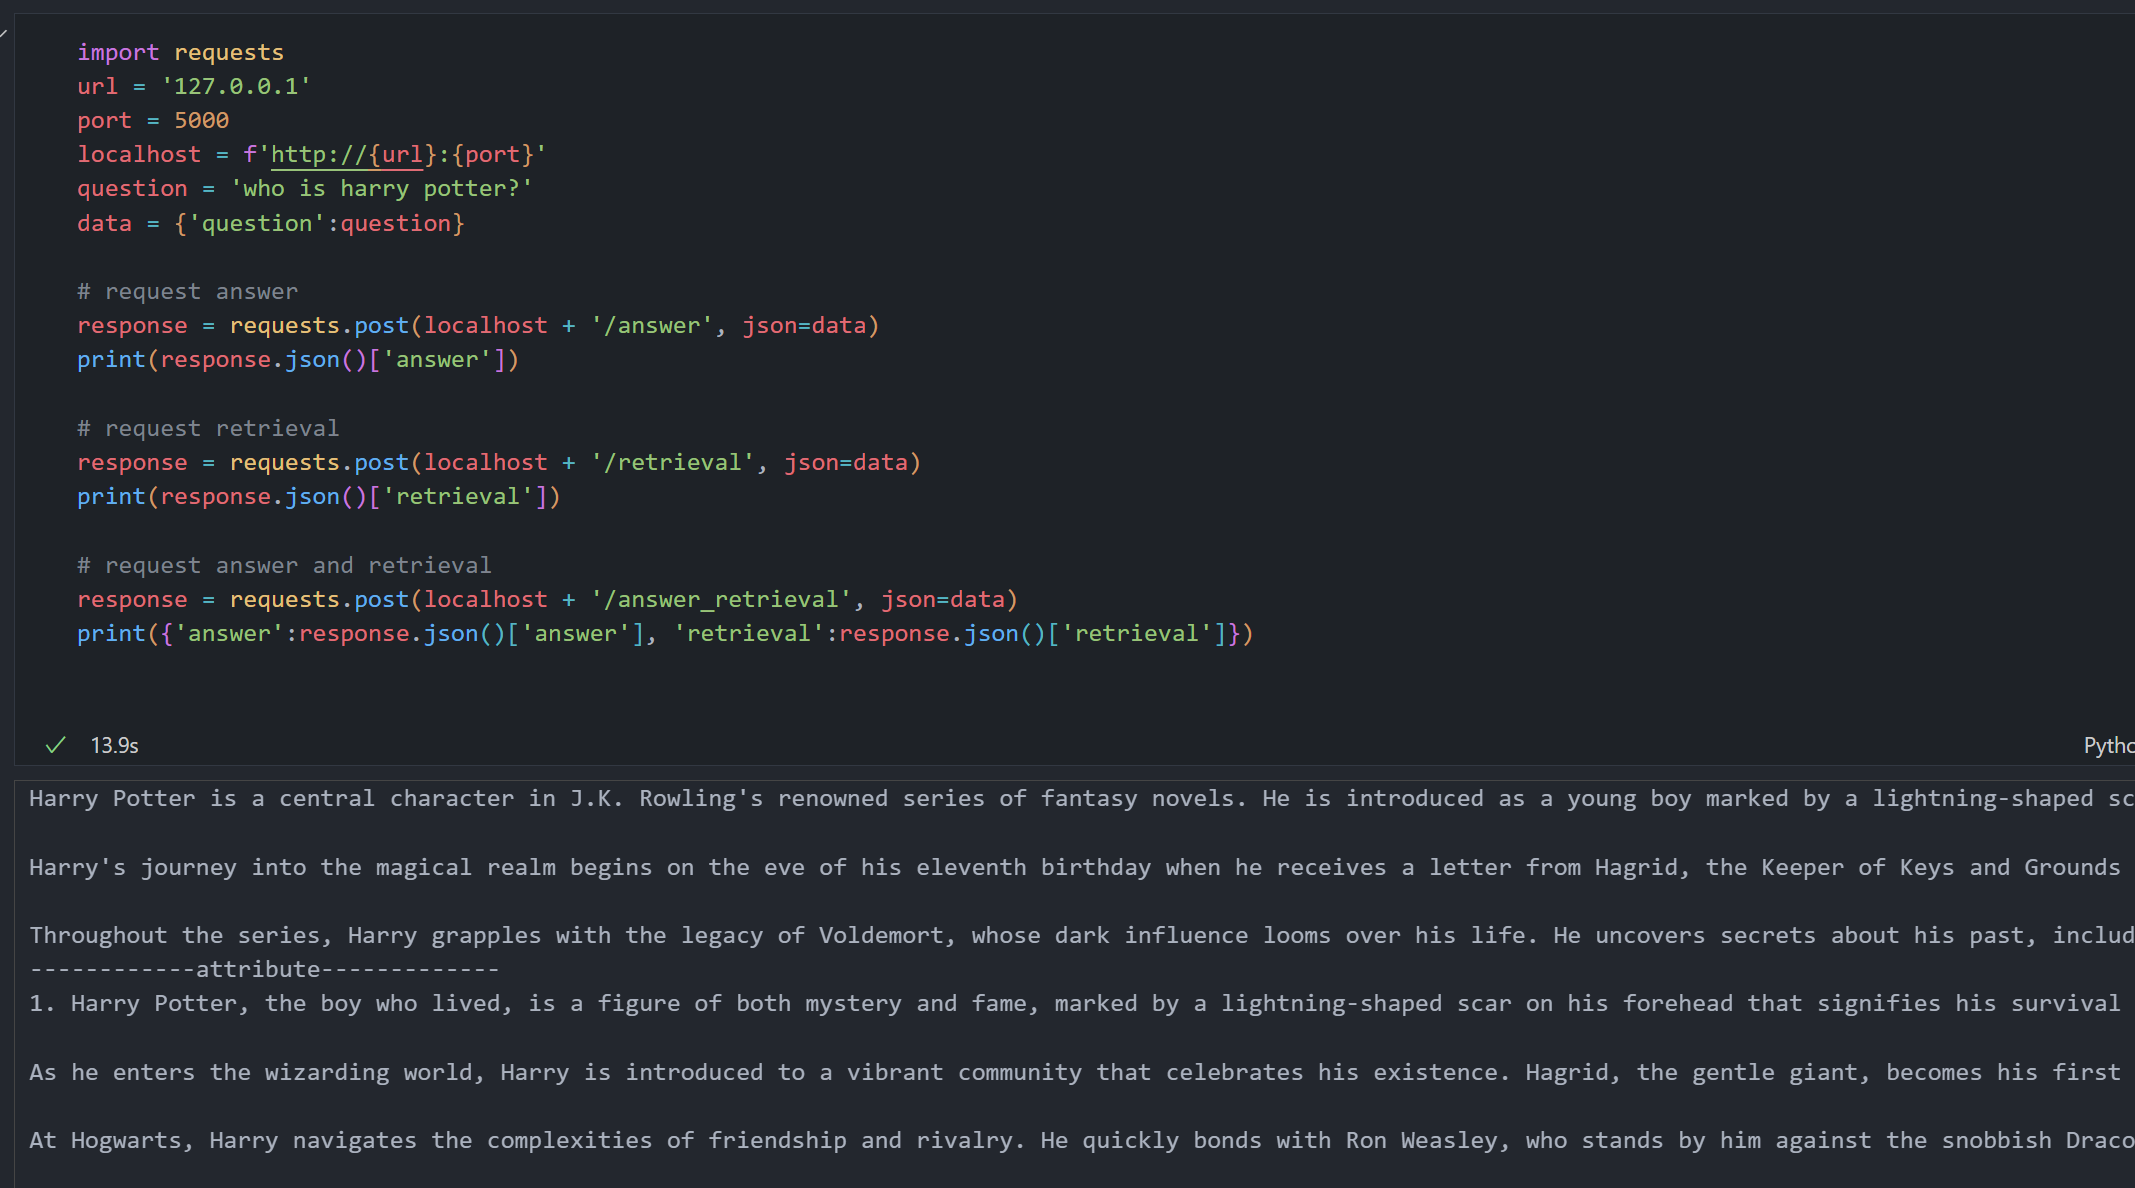
You can interact with the NodeRAG API using Python or within a Jupyter Notebook via HTTP requests. Below is a common usage example.
importrequests# Configure API endpointurl='127.0.0.1'port=5000localhost=f'http://{url}:{port}'question='who is harry potter?'data={'question':question}# Request answer onlyresponse=requests.post(localhost+'/answer',json=data)print(response.json()['answer'])# Request retrieval context onlyresponse=requests.post(localhost+'/retrieval',json=data)print(response.json()['retrieval'])# Request both answer and retrieval contextresponse=requests.post(localhost+'/answer_retrieval',json=data)result=response.json()print({'answer':result['answer'],'retrieval':result['retrieval']})
Explanation
POST /answer: Returns the generated answer to your query.
POST /retrieval: Returns the relevant context retrieved from the corpus.
POST /answer_retrieval: Returns both the answer and its associated context.
⚙️ Note: Ensure the API server is running before sending requests. You can configure the host and port in Node_config.yaml via config.url and config.port.
4 - Configuration Guide
Configure NodeRAG
This guide will help you set up and configure your NodeRAG project.
Config
python -m NodeRAG.build -f path/to/main_foulder
When you first use this command, it will create Node_config.yaml file in the main_folder directory.
You need to modify the config file according to the following instructions (add API and service provider) to ensure that NodeRAG can access the correct API.
#==============================================================================# AI Model Configuration#==============================================================================model_config:service_provider:openai # AI service provider (e.g., openai, azure)model_name:gpt-4o-mini # Model name for text generationapi_keys:# Your API key (optional)temperature:0# Temperature parameter for text generationmax_tokens:10000# Maximum tokens to generaterate_limit:40# API rate limit (requests per second)embedding_config:service_provider:openai_embedding # Embedding service providerembedding_model_name:text-embedding-3-small # Model name for text embeddingsapi_keys:# Your API key (optional)rate_limit:20# Rate limit for embedding requests#==============================================================================# Document Processing Configuration#==============================================================================config:# Basic Settingsmain_folder:C:\Users\Terry_Xu\Desktop\HP# Root folder for document processinglanguage:English # Document processing languagedocu_type:mixed # Document type (mixed, pdf, txt, etc.)# Chunking Settingschunk_size:1048# Size of text chunks for processingembedding_batch_size:50# Batch size for embedding processing# UI Settingsuse_tqdm:false# Enable/disable progress barsuse_rich:true# Enable/disable rich text formatting# HNSW Index Settingsspace:l2 # Distance metric for HNSW (l2, cosine)dim:1536# Embedding dimension (must match embedding model)m:50# Number of connections per layer in HNSWef:200# Size of dynamic candidate list in HNSWm0:# Number of bi-directional links in HNSW# Summary SettingsHcluster_size:39# Number of clusters for high-level element matching# Search Server Settingsurl:'127.0.0.1'# Server URL for search serviceport:5000# Server port numberunbalance_adjust:true# Enable adjustment for unbalanced datacross_node:10# Number of cross nodes to returnEnode:10# Number of entity nodes to returnRnode:30# Number of relationship nodes to returnHnode:10# Number of high-level nodes to returnHNSW_results:10# Number of HNSW search results similarity_weight:1# Weight for similarity in personalized PageRankaccuracy_weight:1# Weight for accuracy in personalized PageRankppr_alpha:0.5# Damping factor for personalized PageRankppr_max_iter:2# Maximum iterations for personalized PageRank
Configuration
service provider
We currently support model service providers such as openai and genmini. For embedding models, we support openai_embedding and gemini embedding. We strongly recommend using openai as the model provider. This is because openai’s structure decoding functionality can effectively follow structured decomposition prompts to generate heterogeneous graphs, providing great stability. Unfortunately, the current gemini models and other models (eg. DeepSeek), even the latest gemini 2.0, have shown instability in structured outputs. We discussed this issue in this blog.
Available Models
When you choose a service provider, you can use all the currently available models they offer.
For example, if you choose openai as the service provider, you can use all the models listed in the latest models on their website.
Here are some examples of available models for openai:
gpt-4o-mini
gpt-4
gpt-4o
For embedding models, openai_embedding offers:
text-embedding-3-small
text-embedding-3-large
Please refer to the Embeddings for the most up-to-date list of available models.
Rate Limit
OpenAI accounts are subject to rate limits, including restrictions on the number of requests and tokens per minute. You can adjust the request rates for both the embedding model and the language model to control usage spikes by setting appropriate rate limits.
For more information on account tiers and specific rate limits, see the OpenAI Rate Limits Guide.
Language
Currently, English and Chinese are supported. To add support for additional languages, modify the prompt-related text and update the language return field in promanager accordingly. See Prompt Fine-Tuning for more details.
Embedding Dimension
dim represents the number of dimensions in the embedding vector. Please ensure this value matches the embedding model you are using. For example, OpenAI’s embedding dimension is 1536, while Gemini’s embedding dimension is 768.
5 - Prompt Fine-Tuning
This guide will help you fine-tune prompts for NodeRAG to optimize performance and accuracy.
The simplest way to customize prompts is to open the files and directly modify the English and Chinese prompt text as needed.
New Language Support
You can add support for additional languages by defining corresponding prompts and registering them in the prompt manager.
1. Add Prompt
To add a new language (e.g., German), define prompts for that language in the relevant prompt file. For example, in the decompose.py, add:
decompos_query='''
Please break down the following query into a single list...
Query:{query}'''decompos_query_Chinese='''
请将以下问题分解为一个 list...
问题:{query}'''decompos_query_German='''
Bitte zerlegen Sie die folgende Anfrage in eine einzelne Liste...
Anfrage:{query}'''
2. Register in Prompt Manager
Next, register your new prompt in the prompt manager: Open prompt_manager.py and do the following:
Import your new prompt variable(s)
Add a new case in the match statement to handle the language
Learn about NodeRAG’s core data structures and components.
This guide explains the fundamental structures used in NodeRAG.
File Structure Overview
The following structure is generated after the indexing process is completed. Each folder and file serves a specific purpose for efficient retrieval and graph-based reasoning.
Stores all processed data, including semantic structures, embeddings, and graph data, optimized for fast retrieval and reasoning.
attributes.parquet: Stores metadata attributes extracted from the corpus.
documents.parquet: Contains processed document-level data entries.
entities.parquet: Extracted named entities for linking and graph construction.
graph.pkl: Serialized heterogeneous graph based on hash ids.
high_level_elements.parquet: Aggregated high-level units (e.g., High level ponies).
high_level_elements_titles.parquet: Titles of the high-level elements for structured navigation.
hnsw_graph.pkl / HNSW.bin: HNSW (Hierarchical Navigable Small World) index for fast similarity search.
id_map.parquet: Maps internal IDs to Nodes.
relationship.parquet: Relationship data between entities or semantic units.
semantic_units.parquet: Core semantic content units for fine-grained querying.
text_decomposition.jsonl: Decomposed text data in JSON Lines format, used for indexing.
text.parquet: Raw or lightly processed text segments stored efficiently.
info/
Contains indexing status, logs, and metadata for tracking and reproducibility.
document_hash.json: Hashes of input documents for change detection and incremental updates.
indices.json: Information about numbers of each nodes.
info.log: Log file capturing processing steps and times.
state.json: Workflow state snapshot used for resuming or auditing the indexing process.
input/
Input files and configuration for the indexing process.
*.(txt, md): Example input corpus.
Config
Node_config.yaml: Configuration file specifying indexing parameters, model settings, and paths.
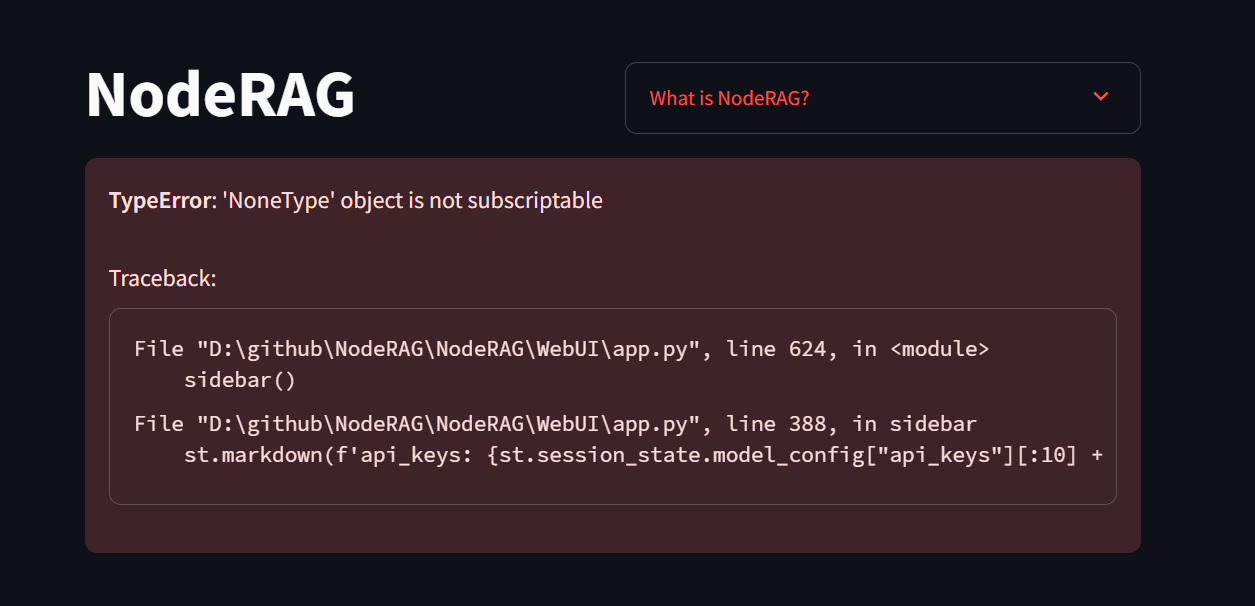
7 - WebUI
This guide will help you navigate and utilize the WebUI for NodeRAG.
Get familiar with project construction
The NodeRAG project has the following structure. You need to manually construct this structure by creating a project folder and placing the input folder inside it. In the input folder, place the corpus you need to RAG.
Note: It is normal to see an error the first time you run this command. NodeRAG will automatically create a Node_config.yaml file in your main folder.
Next Steps
Modify the configuration file to include your API credentials and service provider details. This ensures NodeRAG can access the correct API endpoints.
To quickly try out the NodeRAG demo, add your OpenAI API key. If you don’t have an API key, refer to OpenAI Auth.
Enter the API key in both the model_config and embedding_config sections.
Example Configuration (Node_config.yaml)
#==============================================================================# AI Model Configuration#==============================================================================model_config:model_name:gpt-4o-mini # Model used for text generationapi_keys:# Your OpenAI API key hereembedding_config:api_keys:# Your OpenAI API key here
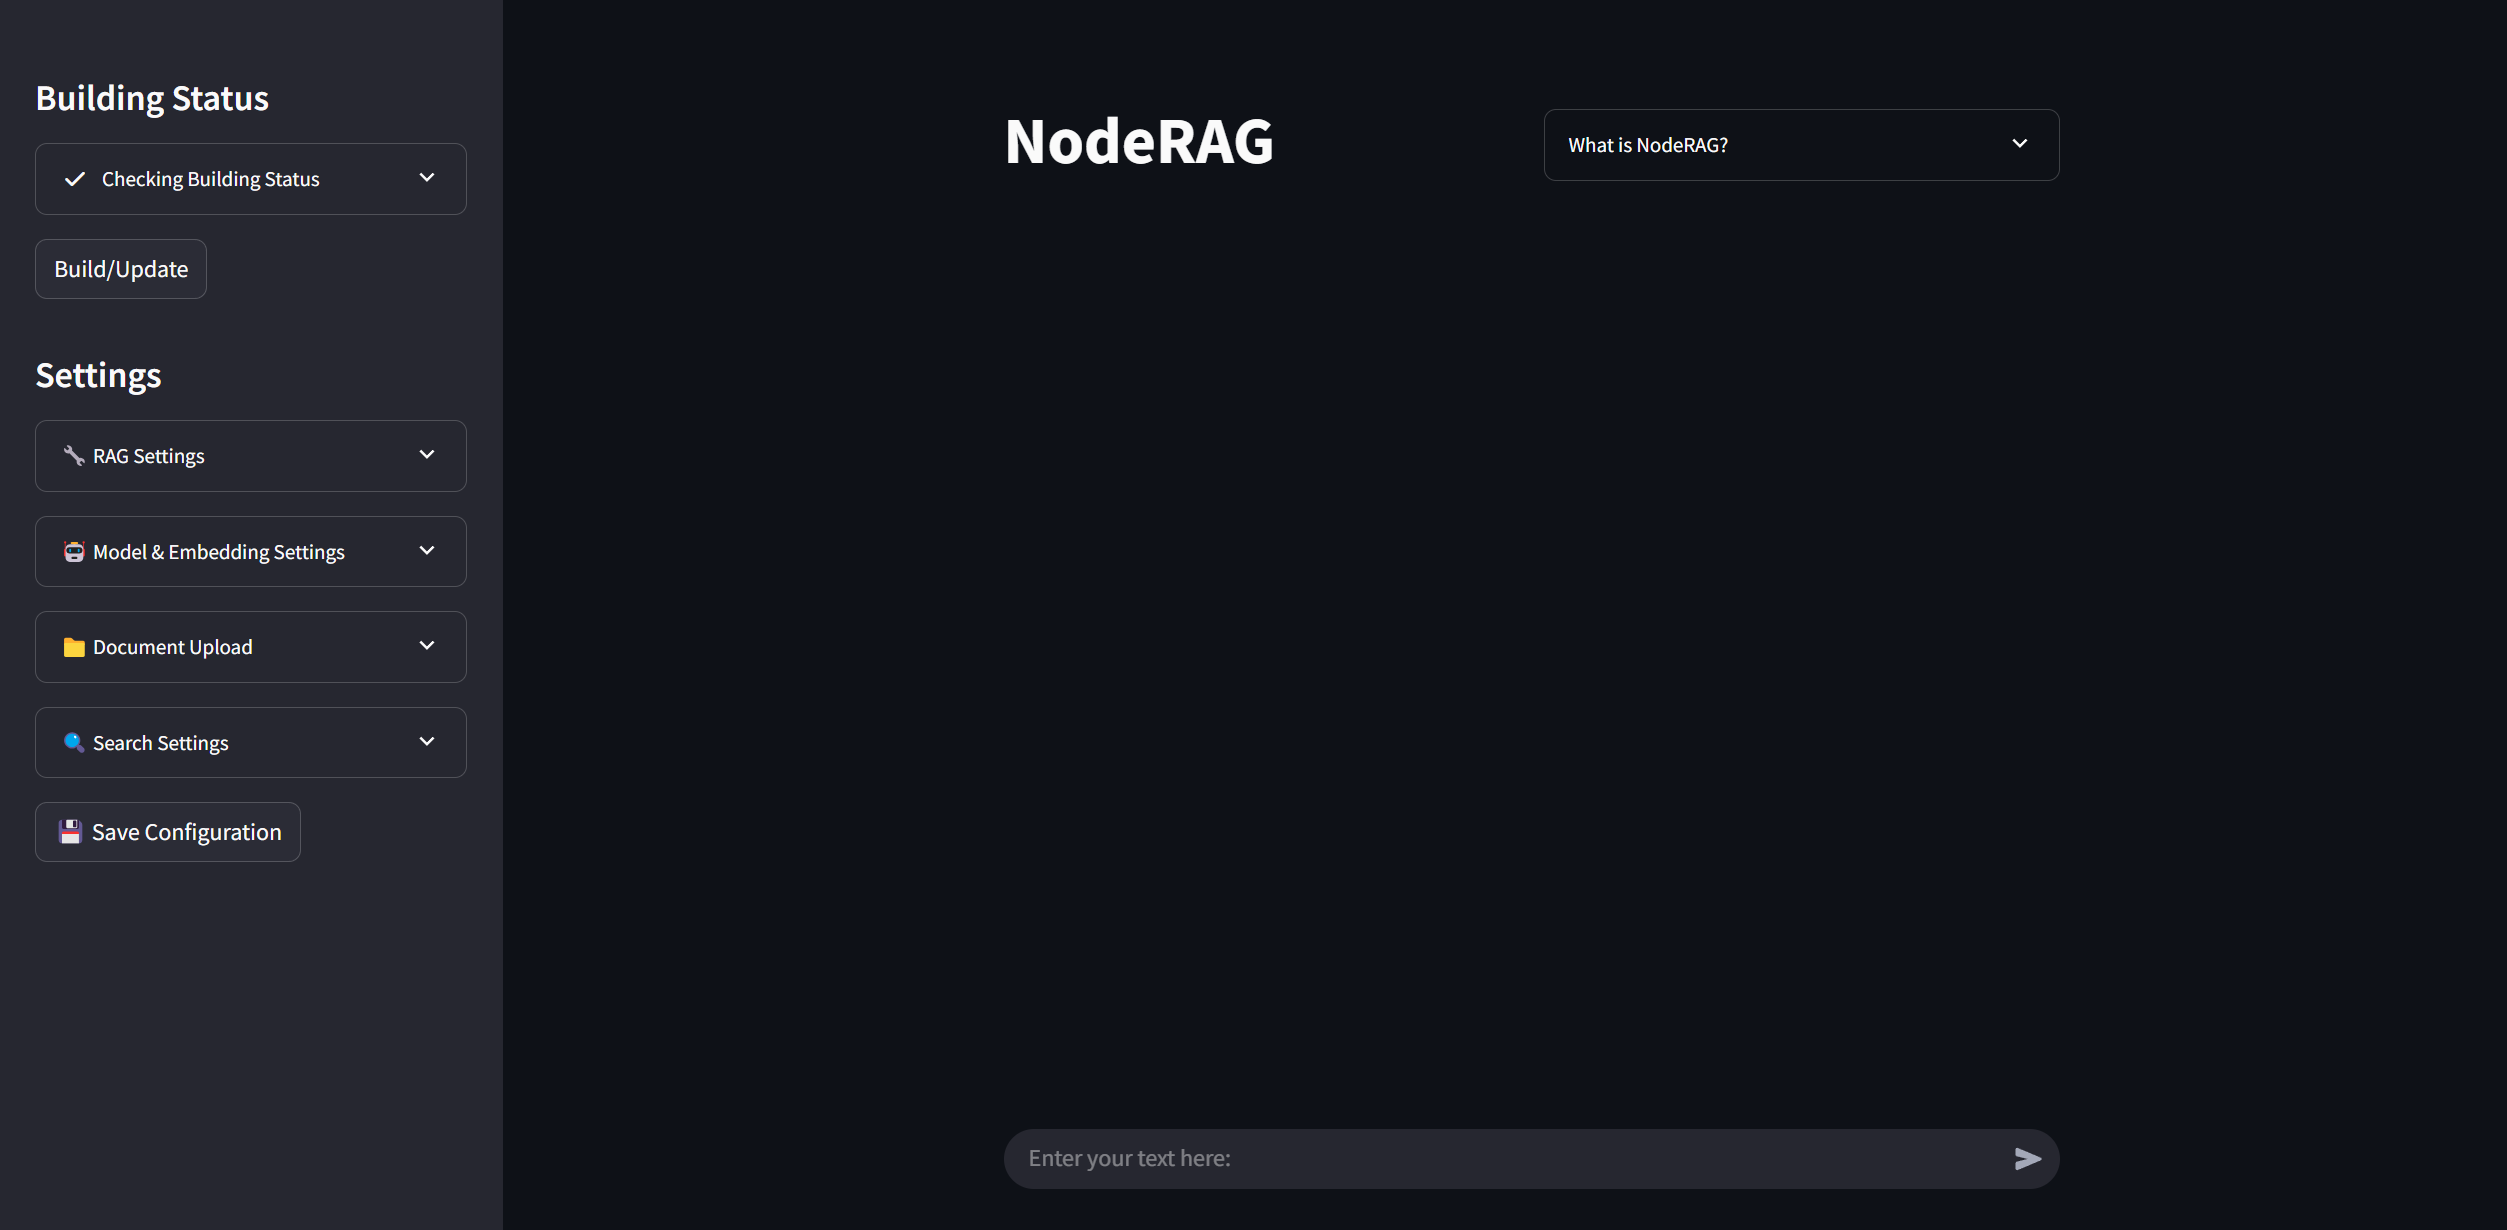
After completing the configuration, return to your browser and refresh the page. You should now see the WebUI interface displayed correctly.
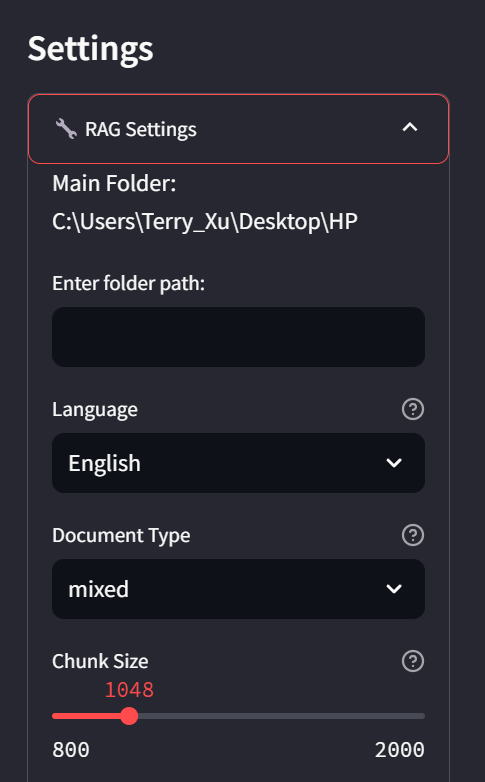
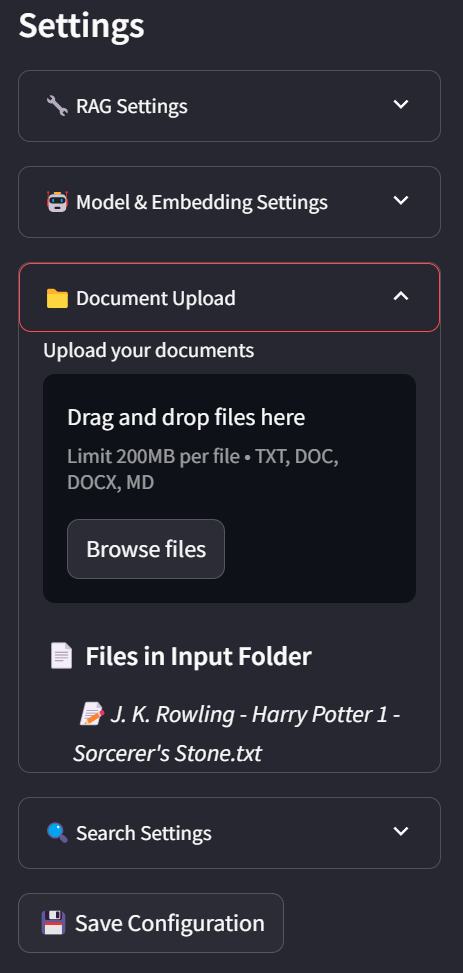
In the sidebar, you can view the current status and configuration parameters. You may adjust these parameters to suit your preferences. You can also import files by dragging them directly into the file system panel.
To save all your configuration settings, click the Save Config button.
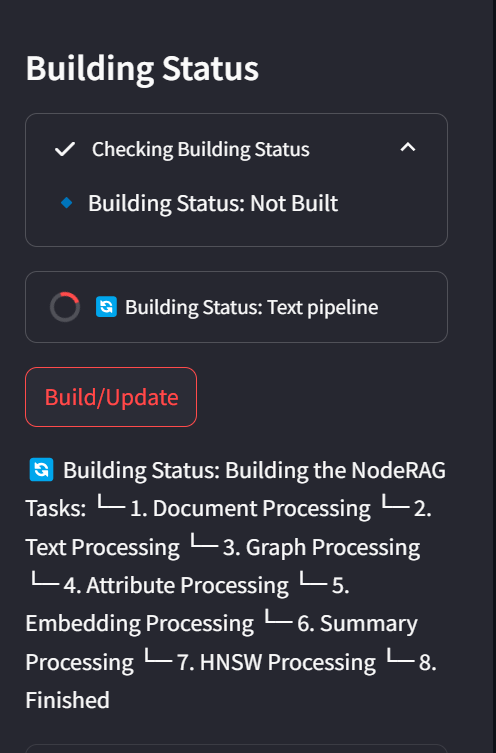
When you’re ready, click the Build button to start indexing your corpus.
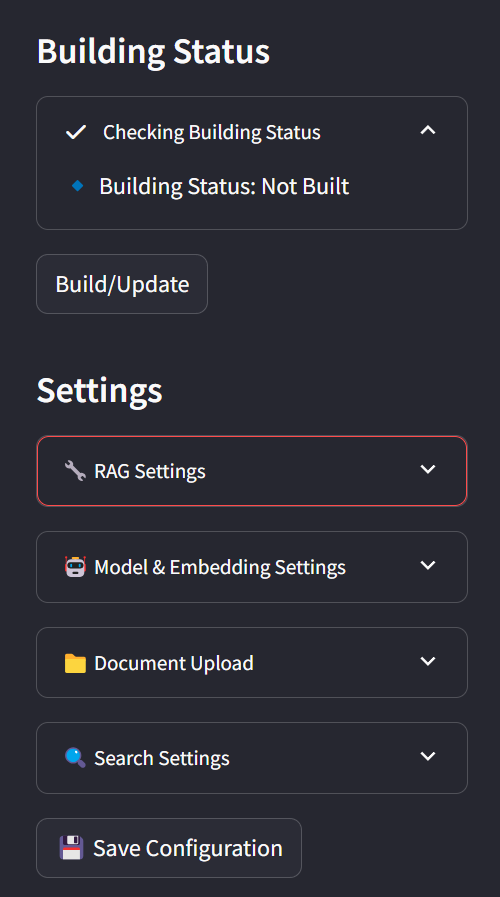
Build Process
Building the index may take some time depending on the size of your corpus. You can monitor the progress through the WebUI or via logs in the Python backend.
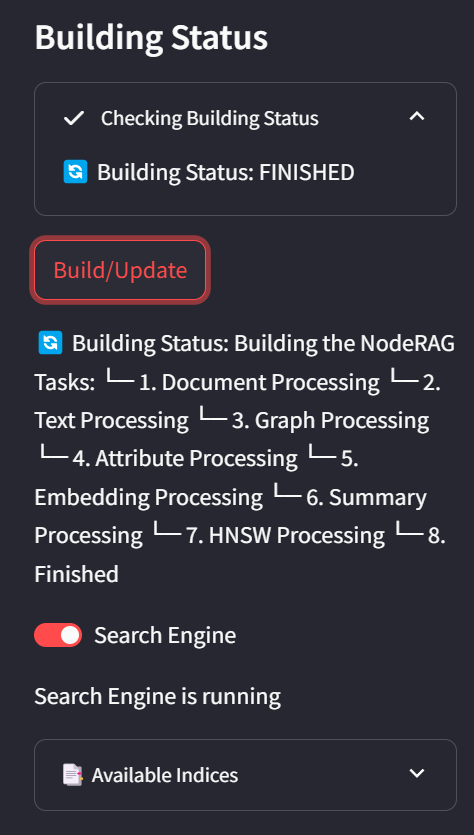
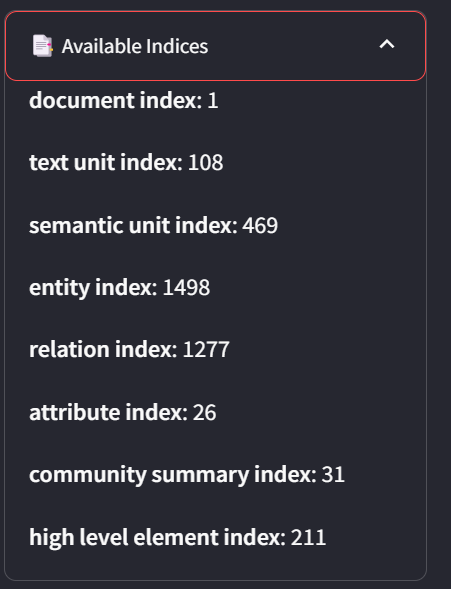
Once the build is complete, you will see the Search Engine option enabled, the status will show Finished, and the Indices section will appear.
In the Indices tab, you can view detailed statistics for all nodes in your corpus.
Asking
🎯 It’s time to ask domain-specific questions — cheers! 🎉 📄 Relevant retrieval context will be displayed above each answer.
8 - Visualization
This guide will help you visualize data using NodeRAG to optimize performance and accuracy.
Fast Implementation
The easiest way to generate a visualization is by running a single command. This will create an interactive HTML page based on your indexed data.
You can view a live example with the Harry Potter corpus here: Example
python -m NodeRAG.Vis.html -f path/to/main_folder
You can also control the number of nodes displayed using the -n flag.
Note: The final number of nodes may exceed your selected value, as we apply internal optimizations for visualization quality. We’ll explain the details behind the visualization process later.
Generating a visualization with thousands—or even tens of thousands—of nodes and edges is highly resource-intensive and often impractical for browsers. Therefore, NodeRAG’s visualization does not use all nodes from the corpus. Instead, it selectively includes a fixed number of important nodes based on relevance.
How Nodes Are Selected
Node importance is calculated using the PageRank algorithm. NodeRAG ranks all nodes by importance and selects the top n nodes for visualization, where n is user-defined.
Best Practice: Set n to 1000 or less for optimal performance. Higher values may cause rendering issues in HTML browsers.
Ensuring Graph Connectivity
A common issue is that the top-ranked nodes may not form a fully connected graph. To solve this, NodeRAG applies the Bidirectional Dijkstra Algorithm on its heterogeneous graph to extract additional linking nodes. This ensures the final visualization is fully connected, with no isolated nodes.
Note: This is why the total number of nodes in your visualization may exceed your specified n value.